The Epcot Ball!
| Site Info: | Favorites: | C++: | Fun: | Newer Stuff: | Old Fun: | Old Tech: | Old Other: |
| News | Rating System | MinGW Distro | Image Hacking | SF Reviews | Origami Polyhedra | bwtzip | Quotations |
| Stephan T. Lavavej | Paper Airplane | Random Work | Book Reviews | ||||
| Deus Ex | PNG | Downloads | |||||
| Anime/SF | Mersenne Primes | Wallpaper | |||||
| Foundation | Diet |
The Epcot Ball!
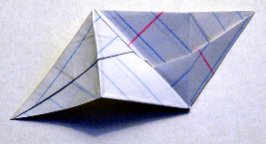
A completed piece.
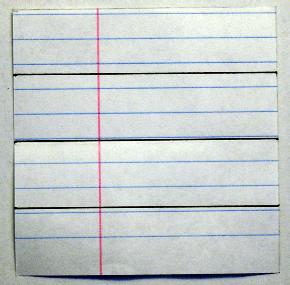
This is your final goal for this section: to make a completed piece. This process is actually very easy and quick; once mastered, it ought to take you one minute per piece. (For the purposes of photographing this process, I used a 3-inch square; you should use a 1.5-inch square. This is why my photos will have more blue lines on them than your squares will have.) So, start with a 1.5-inch square of paper:

A freshly cut square of paper.
Make a precise and creased fold lengthwise. Here is what I mean:
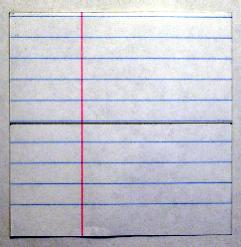
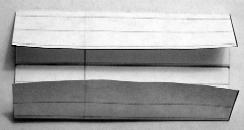
Dividing the square in half.
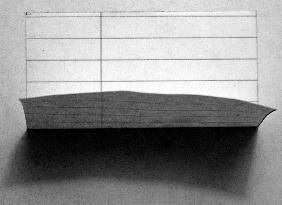
Here is the process halfway through completion.
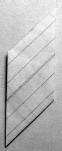
The actual purpose of this fold is just to give you a reference to make the next two folds. Unfold the paper and lay it flat. Take the bottom edge of the paper and fold it to the center crease; then spin the paper 180 degrees and do the same. Here is what I mean:
The folds that you'll be making.
Here is the process halfway through completion (both folds are shown simultaneously; you should make them one at a time, of course).
Okay. Now, unfold the paper and lay it flat. (You will be folding the paper here again; you just need to do some things in the meantime. I'll refer to these folds, rather uncreatively, as "the second and third folds" later on.) Take the bottom-right corner of the paper and fold it into a triangle so that what was the left side of the paper now lies on top of the second fold you made. Leave that folded, spin the paper 180 degrees and make the same fold. Here is what I mean:
Folding two triangles.
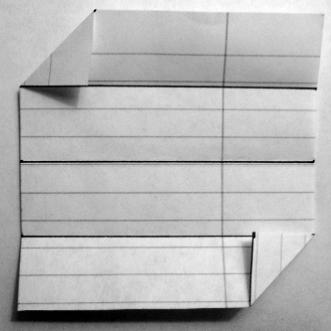
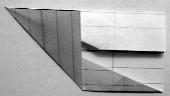
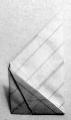
This is the traditional fold you make when producing a (lousy) needlenose paper airplane. Now, take the bottom-right corner of the paper and make another needlenose-type fold. That means bringing the fold that you just made to lie exactly on top of the second fold you made. Then rotate the paper 180 degrees and make the same fold. The following image's bottom-right corner shows the end result of this process; the upper-left corner shows it halfway through completion.

Another "needlenose" type fold.
That fold was hard to describe but easy to perform; it's used in the production of lousy needlenose paper airplanes everywhere. Now is the time to remake the second and third folds you made:
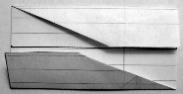
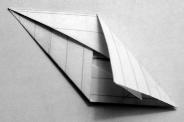
Okay. Now, take the bottom-left corner of the paper and fold it so that what was the left edge of the paper now lies on top of the top edge of the paper, producing a triangle, like this:
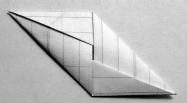
Rotate the paper 180 degrees and repeat. A parallelogram! Now, you must tuck in that large triangle fold into the paper. I have no way to easily describe this in words. Here is what I mean:
The left fold is tucked in, while the right fold is not.
Then rotate the paper 180 degrees and tuck in the other fold, resulting in:
Good. Now flip the paper over and rotate it so that it looks like this:
The backside of the paper.
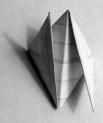
Fold the bottom point of the paper straight up to meet another vertex of the parallelogram, like this:
Then rotate the paper 180 degrees and repeat, producing this:

Okay. Now you need to give the paper a bend in the middle. (This is actually a mountain fold, but I could have you flip the paper over again and make a valley fold; so what?) You will end up with this:
Now, as you can see, you have a finished piece:
Congratulations.
Now, here's a bit of useless trivia: you can actually make mirror-images of these pieces. The crucial decision comes when you make the triangle folds after the second and third folds. If you choose to make them on the bottom-left and upper-right corners of the paper, and modify subseqent folds accordingly, you end up with a left-handed piece instead of a right-handed piece. (The pieces are chiral, in other words.) Being right-handed and very used to making right-handed pieces such as I've shown here, making a left-handed piece takes a lot of time for me. (I have no idea if left-handed people find left-handed pieces easier to make, or if right-handed people who've never made pieces before find left- or right-handed pieces easier to make.) However, and this is the important part, left-handed pieces and right-handed pieces cannot be used in the same model! They just won't fit together. So if you make one left-handed piece, all of the pieces in your model will be left-handed. (I also have trouble assembling left-handed pieces into models, because everything is reversed.) Stick with right-handed pieces. Incidentally, my best friend Uche Akotaobi delights in making left-handed pieces, for no reason other than to annoy me. :-D
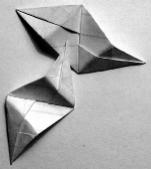
And here they are locked together, corner in pocket:
Here is a third piece, placed over the first two:
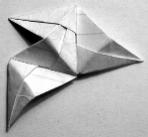
And here the third piece is locked in:

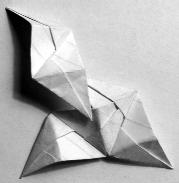
There is a free corner and free pocket that can be locked together. Doing so necessitates forming the three pieces into a three-dimension configuration that I call a peak:

It is vitally important to understand what I mean when I say "peak", because peaks are the founding blocks of your models. (Although you should assemble your models piece-by-piece and not make a bunch of 3-piece peaks and then assemble the peaks. The former works; the latter won't. Example: the cube contains three peaks, but only requires six pieces. Solution: pieces can form more than one peak. Trust me: go piece-by-piece.) Now you should be able to assemble a cube. Here is a cube, pictured with a peak at the center of the image:

A cube.
If you were unable to assemble the cube, then read on, because I will make it even clearer. (I need to demonstrate the next fact with an octahedron; cubes are too small). Now, here is a what I call (somewhat confusingly), a "point". This is my own terminology; call it what you will. Around every "point" in a model there are three or more peaks. The lens flare in the following image shows where a point is located relative to a peak:

This is what I mean by "point".
Here is a picture of an octahedron, with a point more or less in the center of the image. See how four peaks are arranged around the point?
An octahedron.
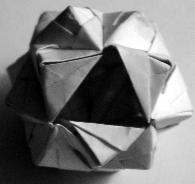
And here is an icosahedron. Icosahedra have five peaks around every point:
An icosahedron.
Forming the first three models, therefore, is quite easy. Simply start out with the required number of pieces (6, 12, or 30) and place 3, 4, or 5 peaks around every point until you've run out of pieces and close the model. You will end up with a cube, an octahedron, or an icosahedron, respectively. (It's hard to show with a single picture how three peaks surround every "point" of a cube.) Here is a picture to make this even more clear; you can see two points very clearly, around both of which are five peaks (there are also two more points on this icosahedron for which you can clearly see the five surrounding peaks, but they're at more of an angle):
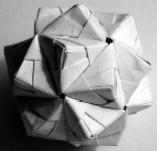
Hopefully that should make what I'm trying to say absolutely clear. Now, here's that icosahedron missing three pieces. This is what you should see when your model is almost completed. (Actually, the last piece is the hardest to put in.)
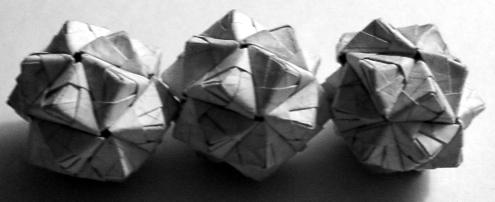
To form a model, simply start with a peak, and add pieces to form peaks in a circular fashion, until you have a point surrounded by 3, 4, or 5 peaks. Then form more points by adding more pieces to make more peaks. Gradually this will cause the model to curve in on itself, until finally it's almost completed like in the image above. It's actually a self-assembling process once you understand what you're doing. If you get really good and precise, you can form models out of 1-inch squares, anything from cubes to icosahedra. Here are the three 1-inch icosahedra I've made:
If you use construction paper, you can make colorful models. Here's a blue-and-red icosahedron I whipped up:
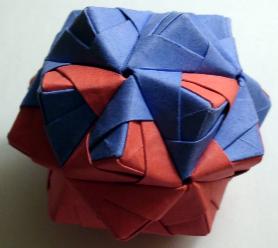
You can also make it so that three colors of pieces make up every peak, for a similarly cool effect.
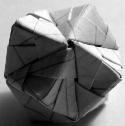
Now, if you try to form a model with 6 peaks around a point, you will find that it cannot be done. (Don't try it; it's a waste of time.) You end up with sheet of peaks. Mathematically, this corresponds to hexagons tiling a plane. There are no other regular polyhedra that you can form. (Tetrahedra are too small, and I do not believe that dodecahedra can be formed with these pieces.) However, have you ever seen a soccer ball? It's made of hexagons, but with twelve pentagons that give it enough curvature to be a ball. (To make matters easy, the hexagons are colored white while the pentagons are black.) You can replicate this here. This mathematical shape, the truncated icosahedron, is also the structure of C60, the buckminsterfullerene (which also goes by the names "fullerene" and "buckyball"). I derived how to make this shape out of pieces on my own, and now I'll teach it to you. I call it the "Epcot ball", for its obvious similarity to the Epcot Center in Disneyworld. Here is a top-on view of an Epcot ball. Notice how a 5-peak point is at the exact center, while 6-peak points surround it in every direction:
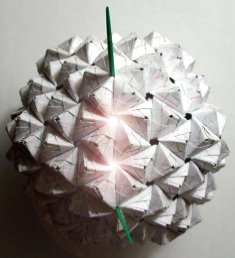
To start making an Epcot ball, surround a 5-point peak with six-point peaks. However, you must also know where to put the other 5-point peaks. The following image shows how. Two 5-peak points are marked by green toothpicks. (By the way, if anyone is still having trouble understanding what I mean by "point", there it is. Marked by a green toothpick.) Conceptually draw a straight line between those 5-peak points. In between, marked by lens flares, are precisely TWO 6-peak points. No more, no less. Here is what I mean:
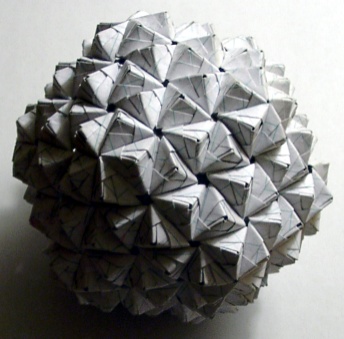
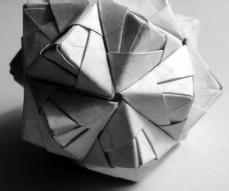
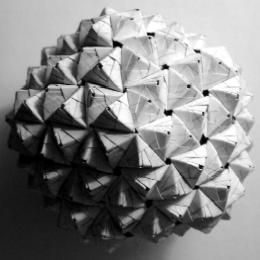
The key to making an Epcot ball, therefore, is to construct a 5-peak point, surround it with 6-peak points, and then surround it with another ring of 6-peak points, and then add exactly five 5-peak points so that they are two 6-peak points away from the original 5-peak point. Repeating this process EXACTLY over the entire surface of the model will produce an Epcot Ball. If you fail to do it exactly, you'll end up with a mutant model that will refuse to close in on itself. Not fun. Epcot Balls require 270 pieces and a substantial amount of time dedicated to making them. (Note: That figure of 270 is hazily remembered by me. Actually, I've never counted the pieces before making an Epcot ball. I just follow the pattern and make pieces as I go. I once derived a simple formula for figuring out the number of pieces one of these things has, but I was never sure that the formula was correct, and in any case I've forgotten the formula and its results. If you indeed discover that 270 pieces is not enough to continue the pattern I've detailed here, then by all means make more pieces. The pattern, not the number of pieces, is key. Although I would be incredibly surprised if 270 is not the correct number. I do remember the number being in the 200's, and being a multiple of 30.) Due to the fact that they're mostly made of 6-peak points, they are not nearly as rigid as the smaller models and can be damaged EASILY by a jolt or by a drop. Be careful with the Epcot Balls that you make. I have made exactly four Epcot Balls in my life; I didn't take a photograph of all of them together (it would be large!), so you'll have to take my word for it. I still have all four. Here is a gratuitous picture of one of them:
The Epcot Ball!
Now I hope you understand what all those lengthy explanations about peaks and points were for. They allow me to communicate how to make the Epcot Ball in a compressed sentence like "...then surround it with another ring of 6-peak points, and then add exactly five 5-peak points...". Please E-mail me at stl@nuwen.net if you had significant trouble following these instructions, so that I may revise this page and make it easier to understand. Also feel free to E-mail me if you've made models according to these instructions and enjoyed it. I would also really like to know if you've made an Epcot Ball. Agnes Harnisch used these instructions to create a very beautiful Epcot ball - note the exquisite precision of the folds. Even my own models don't fit together that well. ^_^ Have fun!
https://nuwen.net/poly.html (updated a long time ago)
Stephan T. Lavavej
Home: stl@nuwen.net
Work: stl@microsoft.com
This is my personal website. I work for Microsoft, but I don't speak for them.